

What is MailChimp?
MailChimp is one of the world’s most popular email marketing platforms. It allows you to create, automate, and monitor email campaigns to effectively engage your audience.
With its advanced segmentation, automation, and reporting features, MailChimp is the ideal tool for businesses of all sizes looking to optimize their email marketing strategy.
Key Features
How to Set Up MailChimp Integration
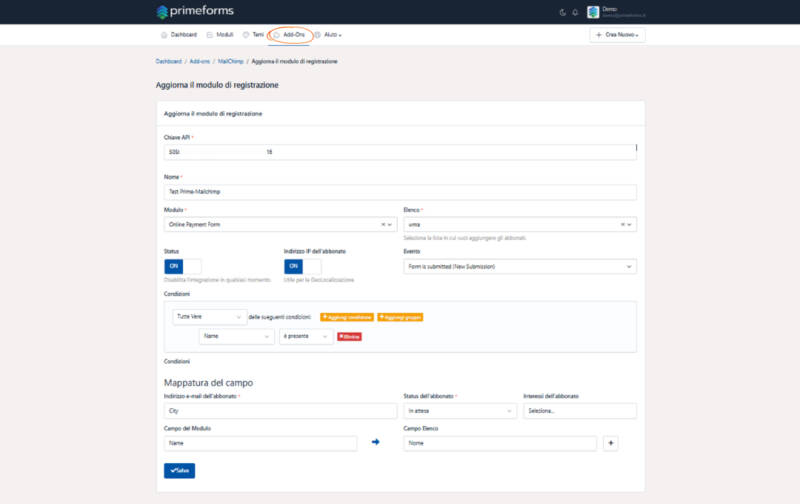
Step 1: Select or create your form
Forms are built using the Form Builder, allowing you to simply drag and drop the fields you need.
You can use the MailChimp add-on with both new forms and existing forms in Primeforms. No need to start from scratch: just select the form you want to integrate with MailChimp and proceed with configuration.
Step 2: Activate and configure MailChimp integration
-
Click Add-Ons in the main menu.
-
Select MailChimp Add-On.
-
Click the Setup Form button.
-
Enter your MailChimp API Key (found in your MailChimp account).
-
Fill in required fields, choosing your MailChimp list and setting subscription conditions.
Tip: If you don’t have a MailChimp API Key, generate one in your MailChimp account under API Keys.
Step 3: Map fields and customize settings
After connecting MailChimp to Primeforms, configure how form data will transfer to MailChimp.
1. Select your list and enable sync
-
Choose the Primeforms Form to connect.
-
Select the MailChimp List for new subscribers.
-
Set Status to ON to activate integration.
-
Enable Subscriber IP Address collection for geolocation.
2. Enable Opt-In Condition
-
An Opt-In Condition ensures subscribers are added only with consent.
-
Typically uses a Checkbox Field with a label like: “Subscribe to our newsletter”.
-
If unchecked, data isn’t sent to MailChimp, ensuring GDPR compliance.
3. Map fields between Primeforms and MailChimp
-
Select the email field (required).
-
Choose subscriber status (Subscribed, Pending, Unsubscribed).
-
Add an Interest Group (optional) for segmentation.
-
Map custom fields to collect additional data (e.g., name, company).
4. Save settings
After configuring all parameters, click Save Form to complete integration.
Get Started Now!
Your Primeforms form is now fully integrated with MailChimp, ready to automatically collect and manage subscribers.
Start automating your email marketing with Primeforms and MailChimp today!