
Creating forms with Primeforms is a straightforward and versatile process, allowing users to integrate custom forms seamlessly into their websites. The step-by-step instructions below will guide you through this process, enabling you to fully harness the capabilities of Primeforms:
1. Starting Your Form Creation #
Primeforms offers flexibility in form creation by providing two main options:
- Creating a New Form from Scratch: Begin by clicking the “Create New Form” button located in the upper right corner of the Primeforms interface. This option allows for a fully customized form tailored to your specific needs.
- Using Predefined Templates: If you prefer starting from a template, navigate to the “Forms” menu in the upper left corner. Click the small arrow next to “Create New Form” to access a collection of pre-designed templates. This is particularly useful if you’re looking for a quick solution or inspiration.
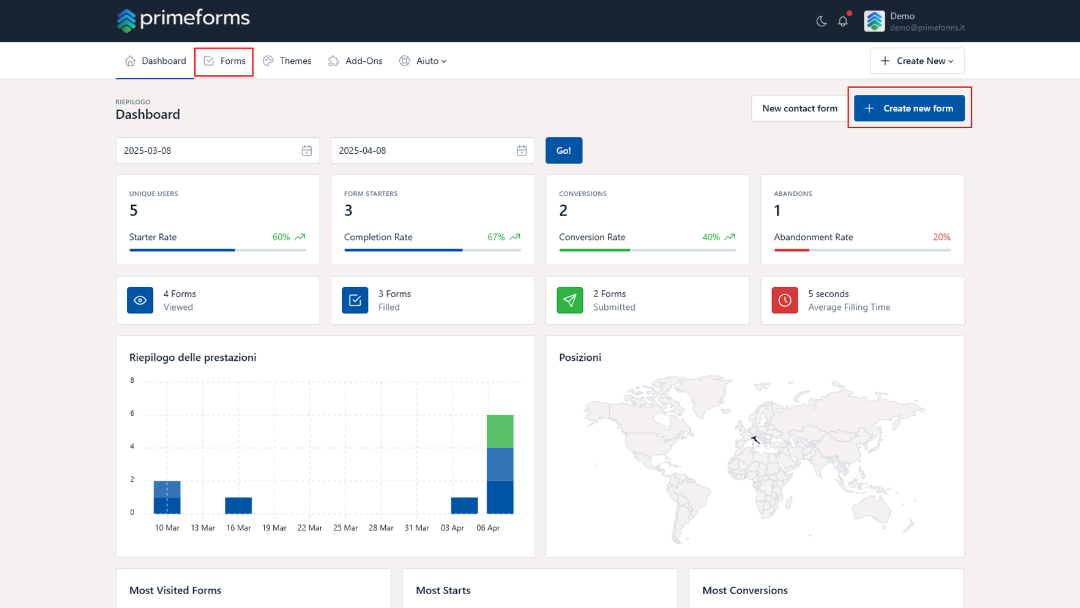
Dashboard Primeforms
2. Utilizing the Drag and Drop Editor #
Whether you choose a template or start from scratch, Primeforms employs a user-friendly Drag and Drop system:
- Customizing Your Form: Drag various predefined fields into your form layout effortlessly. This feature allows for rapid construction and customization, as you can add text fields, checkboxes, radio buttons, dropdowns, and more according to your requirements.
- Design and Layout: Customize the design elements such as colors, fonts, and layout to match your brand or site aesthetics. The intuitive interface helps ensure a cohesive look and feel.
3. Saving and Integrating Your Form #
Once your form is designed to your satisfaction:
- Saving Your Form: Click the “Save Form” button. Choose between accessing the settings for further configuration or proceed to the section where you’ll find the HTML code for your form.
- Embedding the Form: Copy the generated code and insert it into the desired area of your website. This integration allows the form to appear on your site as intended.
4. Display Options: Standard vs. Pop-Up #
Primeforms gives you the choice of how your form will appear:
- Standard Embed: This is the typical approach where the form is directly integrated into a specific section of your webpage.
- Pop-Up Form Display: Select “Embed Pop-Up Form” if you want your form to appear as a pop-up. Configure its appearance and conditions, such as trigger actions like on-click or time-based.
5. Initial Configuration Settings #
Primeforms enables you to adjust several key settings in the first configuration step:
- Name Your Form: Contact your form appropriately for easier management and identification within Primeforms.
- Privacy Options: Decide whether the form will be available publicly or remain private for internal use.
- Disabling Message: Set up a custom message that will appear to users if the form is temporarily disabled.
6. Confirmation Settings #
After submission, users should receive feedback to ensure clarity and satisfaction:
- Confirmation Methods: You can choose to display a confirmation message directly above the form, show a simple message, or redirect users to a new URL (e.g., thank you page or specific landing page).
- User Feedback: Providing immediate confirmation not only assures the user of successful submission but also enhances user trust and experience.
7. Employing Conditional Logic #
Primeforms offers advanced functionality with Conditional Logic:
- Dynamic Responses: Set conditions for form fields that dynamically change based on user input. This can make forms more interactive by showing or hiding fields as needed.
- Confirmation Emails: Utilize conditional logic to send customized confirmation emails to users based on specific criteria met during form submission. Customize elements such as the Sender, Subject, and Email Body to align with the event or user data.
8. Notification Settings #
Notifications are crucial for staying informed about form interactions:
- Event-Driven Emails: Configure your form to send notifications based on specific events (e.g., form submission, error notifications).
- Custom Notification Content: Tailor the subject line, sender details, recipient list, and message content to suit your business needs or communication strategy.
- Internal and External Communication: Ensure both your team and external stakeholders receive pertinent information in a timely manner, thereby enhancing operational efficiency.
Conclusion #
Primeforms’ robust platform empowers you to create, customize, and deploy highly effective forms that integrate seamlessly with your website or platform. By following this guide, you’ll be able to quickly establish forms that not only look professional but also enhance user interaction and data collection. Whether you’re looking to streamline customer inquiries, gather feedback, or manage registrations, Primeforms offers the tools necessary to meet your objectives efficiently.
With these instructions, you’re equipped to explore the full potential of Primeforms, making it easier than ever to manage your online forms and optimize your digital presence.
For more information, please refer to the comprehensive guides on the Form Builder or Form Manager.


Leave A Comment